Diy Water Cooled Amp
I've read about water cooling an amplifier (years ago) and wanted to pursue the concept for my latest, heavily biased, Class A amplifier. It's a very simple procedure, but like most worthwhile endeavors, takes time and elbow grease.
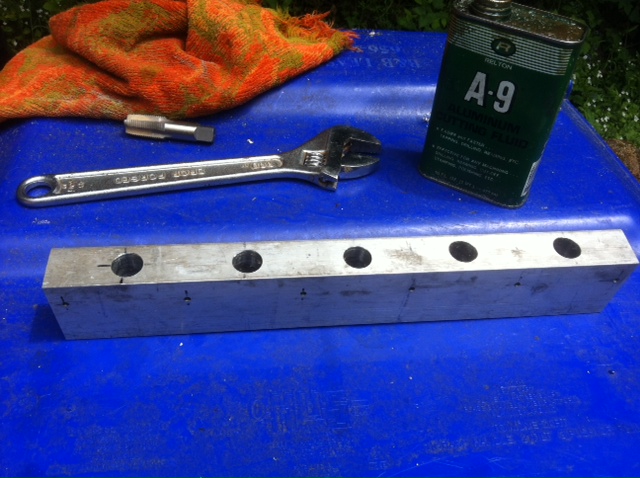
I began my quest at the local scrap metal yard where I managed to locate a sweet looking piece of aluminum with the dimensions of 1.25" x 2.5" x 48". If used judiciously, I can create three heat sink manifolds for three amplifiers. The fifteen pound aluminum bar cost me $45.00.
I decided to use CPVC as the plumbing component. It's capable of withstanding 190º, is inexpensive, won't corrode the aluminum and is easy to use.
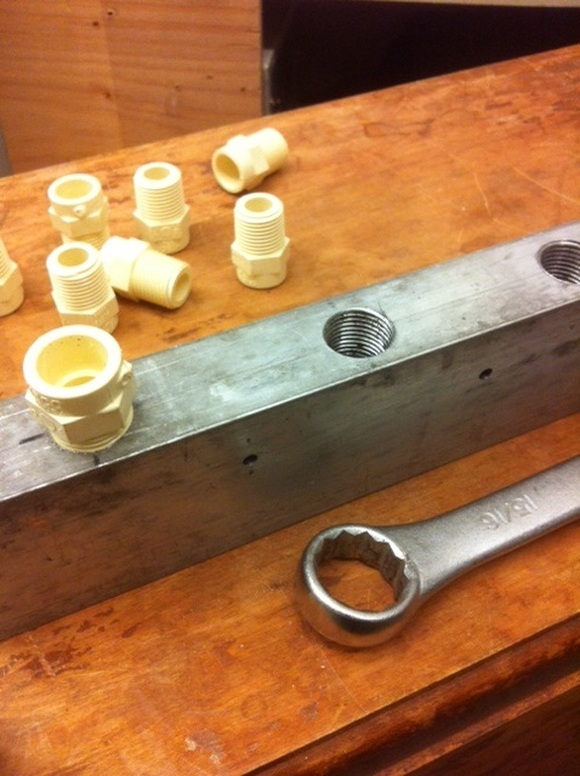
In the picture, above, you see the 1.25" x 2.5" x 16" bar stock. I've bored 3/4" holes for the plumbing, and if you look closely, you can see the six 5/32" holes for the transistors. I'll probably add a few more holes for the power resistors (they require heat sinking too). All I have to do now is tapped those 3/4" holes on both sides of the manifold.
I suppose if one were to bore the coolant holes through the length (rather than the width) of the bar stock, they could reduce plumbing expense, effort, but you'd better own a a commercial drill press, or milling machine because a standard, run of the mill, wood worker's drill press isn't going to get the job done. Of course, you could have a machine shop perform the task, but where's the fun in that?
The beauty of this design is that I can bolt a stereo pair of power stages to the two sides of this manifold while sharing the same bolt holes with both pcbs. I can also mirror this pattern by drilling additional mounting holes an inch away near the other edge which would allow me to mount another stereo pair. That's a lot of heat being removed in a very small physical space.
Now I begin adding the plumbing components. Like I mentioned earlier, I'm using CPVC. It glues up like ordinary PVC, but withstands a great deal more heat. Be sure to use a fan to blow in some fresh air; this glue has a strong odor.
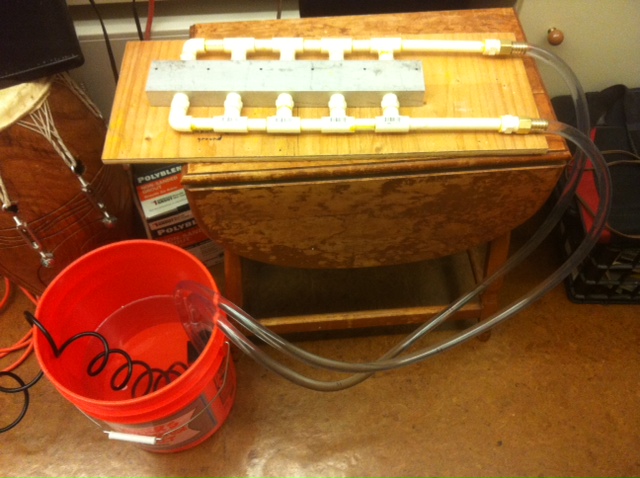
You can tell by observing that brand new orange pail where I purchased my plumbing ($30.00 for pail, and plumbing). You can also see the 1/2" CPVC coupled to clear plastic hose and routed to the water pail. I purchased a 250 gallon per hour fountain pump ($43.00). I've always been one of those "Go big, or go home" kind of guys, so I bought one of the larger pumps. I figure that if the system's efficient enough, I can route the pumped coolant to more than one amp.
Bacterial and microorganisms can be a problem, so in the future I'll experiment with antifreeze. It'll look interesting to see that brightly colored liquid flowing through the clear plumbing, not to mention, antifreeze reduces the evaporation rate.
I've noticed that the pump vibrates a tad (barely noticeable) and is quieter if I suspend it away from the sides and bottom of the pail. I'm thinking about using a big, yellow sponge as a bed to support the pump. Like everything else in this world, there will be problems to solve, and that's how we learn, right?
Total price: $30.00 (plumbing) + $43.00 (pump) + 1/3 aluminum bar: $15.00 = $88.00. Not too bad, if you ask me, the same degree of cooling with conventional heat sink stock would run at least four times that amount, depending on which style/brand you used.
If you consider that I parted the 15 lb. bar into thirds, then this heat sink weighs 5 lb. Add a half pound of plumbing to the mix and the unit weighs 5.5 lb. OK, there's the pail of water to consider, but that can be emptied and then it weighs practically nothing and can be used to transport the hose/pump, etc. The heat sink I normally use weighs around 20 lb. I'm getting pretty pumped at the thought of not wearing my back out carrying my amp from the lab to the stereo.
The plumbing to the manifold can be altered to create a more compact layout, but for now, this unit--at 7" total height--is going to work out just fine for my needs.
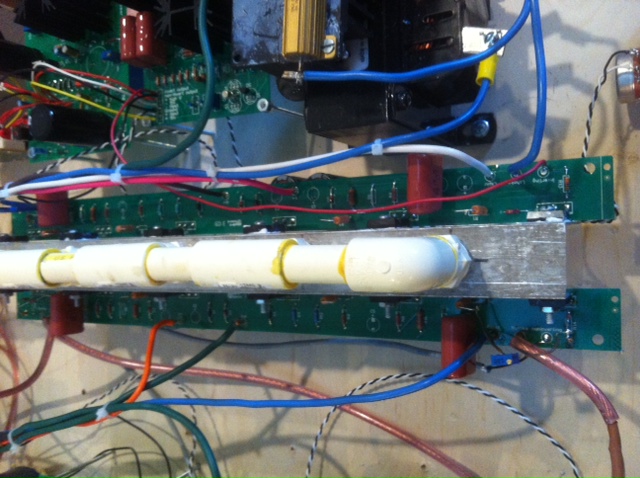
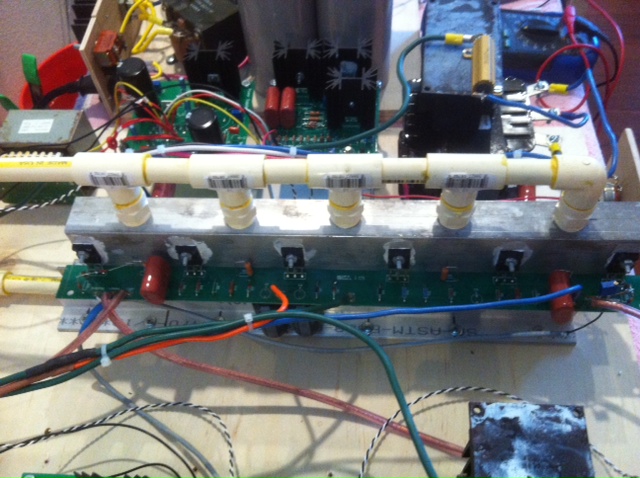
Here's a couple of snap shots of the heat sink in operation on my test mule amp. You'll notice in the lower picture how easy it is to clamp the plumbing in between a pair of aluminum angle pieces. The cold water input is on the bottom and the warm water exit is on top. Gravity does an excellent job of regulating the distribution of the coolant.
This unit is capable of removing heat with ease when the amp is biased at 4.6 amps per channel (there are two channels--one on each side of the heat sink). Things get rather wicked (in an unpleasant way) when the amp is biased at 12 amps per channel.
So if the operating voltage is 25 volts and I'm running 4.6 amps bias current, there's 115 watts in the mix, and if the amp is 25 percent efficient (assumption based on simulation) then 75 percent of 115 watts is wasted energy, therefore, 86.25 watts are going to be dumped. Multiply this times 2 (stereo pair) and the waste is 172.5 watts. The heat sink is mildly warm (my finger can touch the surface indefinitely), and I'm rather impressed.
In the future, I'll be experimenting with a piece of aluminum that's much wider. I'm shooting for a 6" wide heat sink verses this 2.5" project. Perhaps then, I can run 12 amps of bias per channel.