The Paper Horn by Inlow Sound
-
  • The Paper Horn
  • DIY Paper Mache Horn
  • Inlow Sound 15-A
  • Inlow Sound 15-B bass horn
  • 100 hz 12 sided conical horn
  • 40 hz horn with bass reflex
  • Spiral Bass Horn
  • DIY 60 hz crescent horn
  • 135 hz mid bass horn
  • Tube Audio
  • 125 watt KT88 tube amplifier
  • Iron Butterfly: Mosfet amp transformer input/output
  • Inlow Sound Products
  • Reviews of my products
  • Folded bass horn
  • DIY 100hz midbass horn
  • DIY 80hz midbass horn
  • PCBs for your project
  • Horn with Bass Reflex
  • DIY tapped horn sub
  • DIY 4 x 18" subwoofer
  • DIY Class-A amplifier
  • DIY water cooled amp
  • DIY speaker cables
  • Jensen Imperial Horn
  • JBL 2240 60hz midbass horn
  • 25hz 114db 1W1M Horn
  • DIY 16hz sub bass horn
  • Audio Nirvana and T/L
  • Line Array: so simple...
  • Rear loaded horn project
  • DIY heat sinks
  • Horns and Class-A Audio
  • BAF 2009
  • Favorite Links
  • Altec A7 horn
  • Current project

DIY Tapped Horn Subwoofer

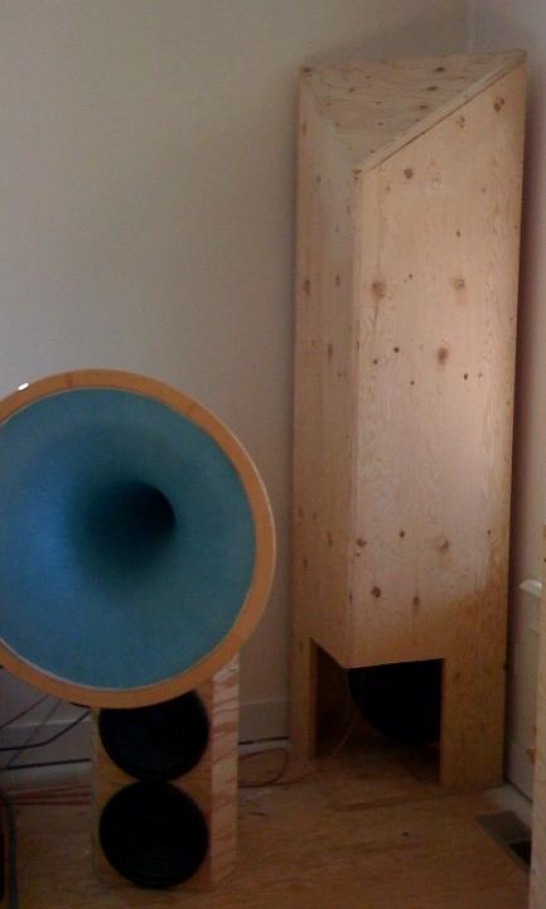
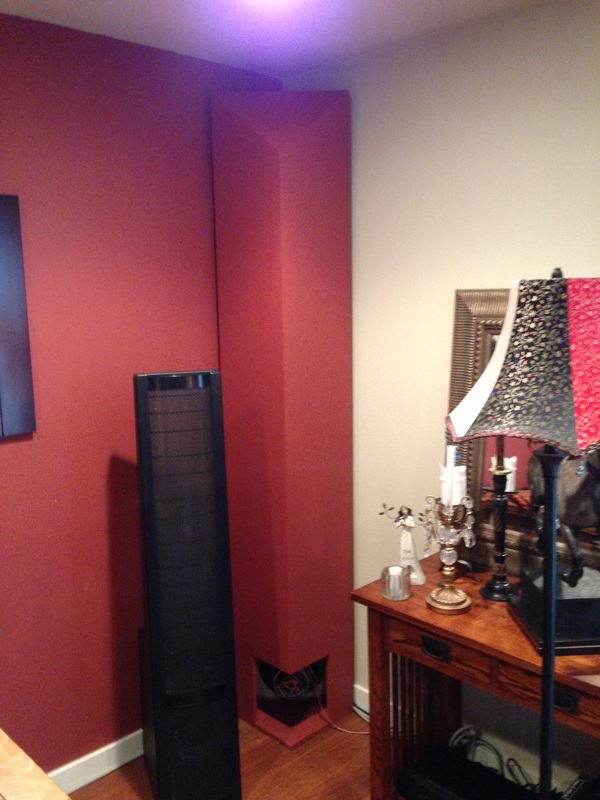
Here stands an eight foot tall bass horn loaded with an 18 inch subwoofer.


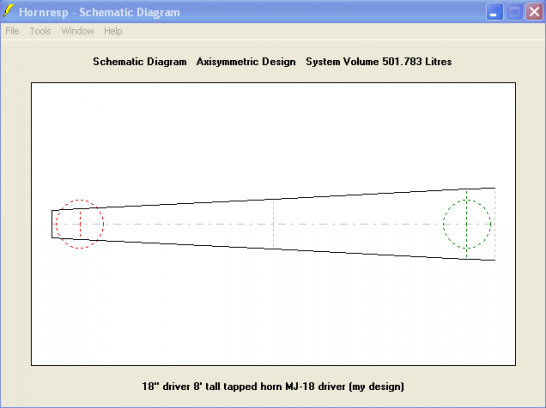
This horn is absolutely amazing! I learned about it from an industrious fellow who lives in Australia: William Cowan. I didn't have his horn's dimensions, so I just eyeballed his layout. Rather than reproduce a direct copy, I turned the inner baffle so that instead of running side to side, it runs corner to corner. I've always been a fan of triangular walls in my speaker enclosures. Triangles are strong and don't resonate with standing waves as do parallel walls.

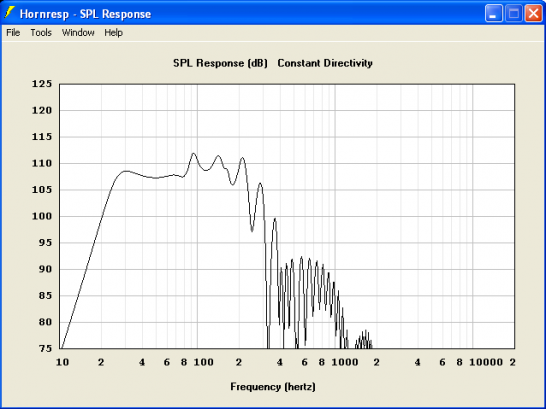
After completing the horn, I hooked it up to the right channel of my 1200 watt subwoofer amplifier. I located a copy of Pink Floyd's "Breath". You know, the song from Dark Side of the Moon that begins with a heartbeat. Well, I'm here to tell you, that song put me in the dog-house with my wife for nearly a week. I suppose that the sound of the house creaking and rattling doesn't impress women the way it does men...

If you ever have the time, inclination, and room, do yourself a favor and fabricate one of these bad boys! You can scale down the drawing to any size woofer you like. A bud of mine is using a Cerwin Vega 10 inch car woofer and it rocks the house down. It can almost keep up with my big fellow.

By the way, one thing that you absolutely must keep in mind: lots of glue and screws! This horn can develop tremendous acoustic pressure and a loose panel will resonate or rattle during a hard kick-drum passage like a loose shutter in a hurricane! I know from experience the frustration of tracking down a rattle--it can drive you nuts. In fact, I ended up using four lengths of 1/2" threaded rod to secure the back of the horn and inner baffle to its bracing. I had to, as the horn actually managed to break the screw and glue bond I originally used. Talk about power!

There's a 10" version available:

My friend, Elizabeth, wanted a big boy horn, but her listening space is small. I happened to have a 10" Cerwin Vega driven tapped horn on hand, so I gave it to her as a gift. We're driving it with a David Hafler P3000 amp in bridge mode--good for 300 watts. The subwoofer signal is taken from her receiver, so no external crossover is required. This little tapped horn totally dominates the Martin Logan electrostatic speakers, and impressed several of her neighbors--thank god she's popular!
Picture

Note:

There are a few things I've recently discovered. For one, you should add additional bracing between the inner baffle and the rear corner of the horn. It tightens up the bass and add tremendous punch to the kick drum. Also, I reduced the speaker's throat to 11". Currently it's labeled at 17-1/2" The smaller throat adds a bit of back pressure on the speaker's diaphragm and protects the driver from over excursion during hard transients. Be certain to add plenty of room (in the form of a plywood spacer) for the diaphragm to extend forward, towards the inner baffle without making contact. You don't want your cone to bottom out against the baffle--ugly thought, that.
In the prints I sell, you see how I added the threaded rod and additional bracing. I recommend using at least three threaded rods to support the inner baffle -- top, middle, bottom. I also run a 2x4 down the center of the inner baffle for support. The horizontal 2x4 bracing attaches to this vertical member, and the threaded rod penetrates it as well, above and below the horizontal bracing (two threaded rods per horizontal brace). The vertical 1x4 cleats are extremely important, and should be fabricated from hardwood (I use oak). Be sure to use large washers to spread the load and not crush the wood.
I'm learning to use Hornresp and this horn is my first training exercise. Assuming I'm using it correctly, the SPL Response curve is pretty cool for this beast of a subwoofer--lots of power too. With 90 volts input on the driver, I get 140 db output from the horn. Wow! The curve below is based on the driver receiving 2.83 volts.
Picture
Picture
Picture
The above graph depicts the horn's performance with 90 volts input from the amp. Chuckle...

​

    Prints are $25.00. Please email me if you're interested.

Submit