Diy Paper Mache Horn
I offer this page for the hearty soul who seeks satisfaction from the DIY approach. This horn sounds remarkable and can be fabricated by anyone with a modicum of skill and a truck load of patience. Yes, your primary asset must be patience (a curious mind helps too).
Initial tasks overview:
1. draft up a full size horn profile in order to ascertain the size of the jig/mold
2. fabricate a table-top (for the horn mold) with a centered flange bearing (creates an axis for your mold to turn)
3. build a platter with four attached casters which, ultimately, allows the mold to roll on its axis
4. size a threaded rod which penetrates the center of the platter, the plaster mold, two bearings. This rod clamps the entire assembly together.
5. last, but not least, fabricate temporary bracing to support the top of the threaded rod (with a second bearing) while applying plaster to the plaster mold.
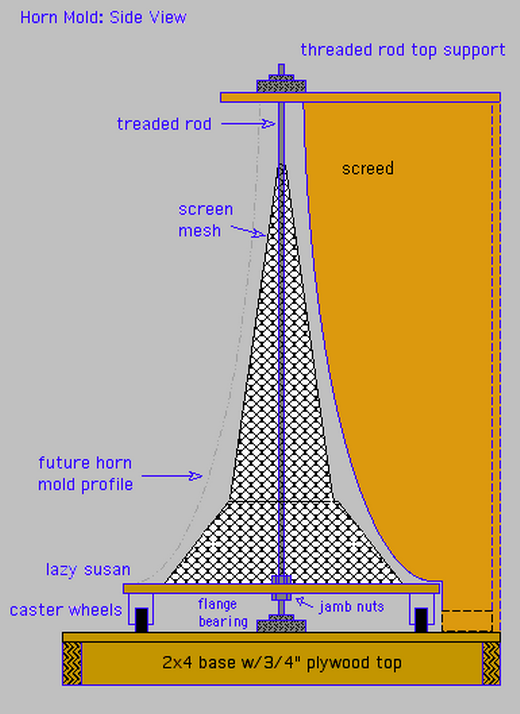
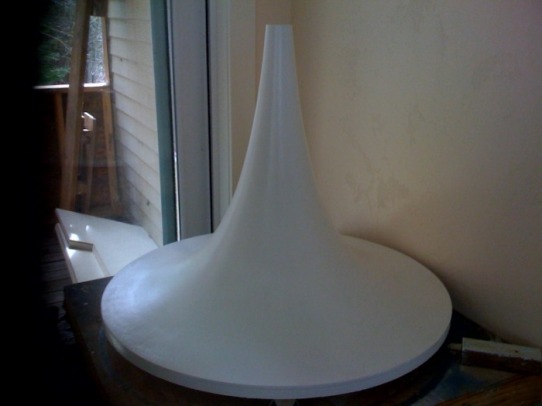
In the upper-most photo, as well as the drawing above, you see what amounts to a horn mold jig. The jig in the first picture is in the painting/smoothing phase.
This is the first part of this DIY journey: fabricate the jig. Here are the necessary steps:
First, you must decide on the size/lower frequency of your horn as well as the profile (tractrix, exponential, hyperbolic, LeCleach, etc).
With that information, you're able to create a square platform (a table top) for the mold to reside. My table is 32 inches x 32 inches (81 cm x 81 cm). I use a piece of sturdy 3/4 inch (19mm) plywood (baltic birch is great if you can find it, otherwise use quality A/C).
Place 2 x 4s (4cm x 9cm) on edge forming a stiffening rim which is glued and screwed beneath the perimeter edge of the plywood table-top. Note: it's a great idea to cover the plywood with Formica if you plan to fabricate more than two horns.
Dead center on this table you'll attach a bearing structure. I use a four bolt flange bearing with a 3/4 inch (19mm) bore, thus allowing the use of a 3/4" (19mm) threaded rod.
The threaded rod is the length of the horn, plus the platter thickness, plus caster wheel height, plus flange bearing depth, plus 4 inches left over for the temporary top support bearing. The threaded rod is first pinned to the flange bearing ring with set-screws and then extends through a "lazy-susan" type of platter.
The circular platter in my mold is 30 inches (76cm) in diameter and 3/4 inches (19mm) thick. Four 2 inch (50mm) casters are attached to the bottom of the platter for stability. My casters are non-swiveling--I'm of the mind-set that non-swiveling is a better choice than swiveling casters--in case you want to rotate the platter backwards. A nut and washer is employed on both sides of the platter which lock it onto the threaded rod. Also, regarding caster choice: pick a flat wheel tread vs. a rounded tread. Rounded treads tend to gouge the plywood surface over time.
If you're still with me, you'll notice that you must take care to allow enough room for the casters to reside beneath the platter and rest on the table-top before tightening the threaded rod/platter nuts.
After calculating your horn parameters, you will be able to determine the height of your horn and place another bearing assembly above the point on the threaded rod where your horn mold ends. This temporary bearing assembly is attached to a removable cross-brace network that supports the threaded rod when you turn the platter during the plastering phase.
Now you must make a screed to create the horn's plaster profile. This means you must have a profile. There are excellent web sites that have horn calculators with which to create a profile. "Single Driver Website" comes to mind. Program the calculator to design you a 200hz tractrix horn. You won't be playing that low, but tractrix horns are not efficient at cutoff--200hz will guarantee a satisfactory 400 hz cutoff point. Anyway, transfer the data to a piece of paper the size of your horn shape and measure and cut yourself a paper pattern (If you wish to purchase my design, contact me via the contact form at the bottom of this page). Tape this pattern to a 24 inch x 30 inch (60cm x 76cm) piece of plywood and trace the shape leaving enough room at the lower corner to mount the screed to the table-top without hitting the platter.
If it seems confusing, just study the drawing; your screed represents the contour of the mold and must be mounted in such a way to create the mold profile. The lower edge of the screed creates the outside edge of your horn mold.
Moving on: When you're finished tracing the profile to the plywood, remove the paper, and with a jig-saw cut the plywood at a 45 degree angle to create a sharp edge--the profile's edge. A sharp, burr free edge won't drag and gouge the plaster as much as a straight, 90 degree cut. Grind, file or sand the edge to perfectly match the curved profile you drew. Accuracy counts! Of interest: Some of my DIY friends fabricate the screed from heavy gauge sheet metal, or aluminum, and fasten it to the wooden screed in such a way that the metal protrudes from the plywood by several inches.
When completed, align the screed to your table-top/platter so that the screed does not interfere with the platter's ability to turn. This is where it's handy to have the top brace in place to support the top of the screed. Take your time and get this portion of the project right. Align the top of the screed so that it's 1 inch (25mm) from the center of the threaded rod and the sharp, profile edge is centered on the rod's axis. This portion of the screed creates the throat of your horn. Get this dimension as exact as possible.
Okay. By now, you have everything assembled. Drill ventilation holes into the platter near the threaded rod. The idea is to dry the center of the plaster mold. Holes in the platter will facilitate the drying process. 1/2 inch (13mm) will do (you can perform this step long before this point--after cutting out your plywood circle. I'm just recording my process).
When this is done, vacuum the wood chips up and locate some wire-mesh screen. I used 1/4 inch (6mm) screen. Form a cone shape and wrap it around the threaded rod. Screw its base down to the platter. Insure that the wire mesh does not touch the screed. As a minimum, I'd give it a finger's thickness clearance. One wire mesh cone will not be enough. You will want to make another cone to support the lower portion of the mold. Stitch the lower cone to the first cone you created--just weave some wire at the junction. Screw the bottom of the cone to the platter. Use as many cones as you feel are necessary to offer a support matrix for the plaster.
The Plaster Phase:
Time to apply the plaster: I use a drywall product nicknamed "hot-mud". It's basically plaster with a hardening inhibitor. This allows the technician time to apply a batch without it hardening prematurely. I use the 90 minute product. Mix up half a 5 gallon pale of material. It's inexpensive, and you don't want to run out of mix in the middle of the screeding process. To avoid slumping, it should be the consistency of chilled peanut-butter. Now, the idea is to slowly turn the platter towards the flat, sharp edge of the screed while applying the plaster to the rim of the platter and building upwards until you reach the throat. It takes about half an hour for this particular horn. With 90 minute mud you have about an hour working time at room temperature. Add plaster where there are voids. Avoid turning the platter when the mud hardens--you don't want the screed to chatter, it'll gouge the mold. Stop when you have a reasonably smooth surface. Do not add water to the hot-mud if it begins to harden before you've completed the mold--if you do, the mold will be weak!
Remove the screed and top support structure when the plaster is hard. Give the mold at least two weeks to cure before sanding out imperfections--this is where the "patience" comes in--if you work the project prematurely, you'll break the mold's walls.
After dry sanding the mold reasonably smooth, apply a sandable, primer. I use pigmented shellac and a foam roller, but you could use an oil based primer too. Follow the directions on the paint can. With shellac, if you re-coat too soon, you'll get uneven dissolving and consequent lifting of the first layer. You can wet sand the shellac (I do) and get excellent results. If you discover voids and pockmarks, fill them with Bondo or some other waterproof filler. Use flexible plastic spreaders to wipe on a thin layer. Wipe the Bondo off fairly hard, unless you enjoy sanding. Repeat the priming/Bondo/sanding process as many times as you have patience for--please, do stop when you hear too many four letter words echoing about the room. If you find yourself swearing, and you're only in the reading phase, then this project may not be for you. Purchase a pair of my ready-made horns, instead. ;^)
A note on sanding: Use lots of sandpaper with equal amounts of elbow-grease. I begin with 60 grit and eventually graduate to 220. Then, when the surface is smooth, I add shellac and continue sanding with 220 grit. Once you have a half-dozen layers of shellac, you'll switch to wet sanding with 400 grit followed by 600. I can't stress enough, the importance of a smooth surface to allow the proper release of the paper mache.
Fabricating your mold is a skilled craft in itself. Your mold is a work of art and should be treated as such. The curves should feel silky, almost sensual -- now, that's art! Once the final coat of primer is absolutely dry and wet sanded, you wipe it down with Acetone (removes shellac's natural wax) and spray a clear urethane finish (I prefer a completely waterproof, catalyzed, automotive urethane), then wet sand with 1000 grit and hand rub polish onto your mold. I use a professional type of automotive rubbing polish (not rubbing compound) that has a bit of fine grit to further polish the urethane. The surface should be almost mirror like. It doesn't have to be perfectly even, but it does have to be perfectly smooth.
Another idea: I recently began using two part epoxy resin to coat my molds. You can brush a thin layer of epoxy onto the sanded plaster and begin working it down with sandpaper after it cures. I add Cab-O-Sil to the epoxy to thicken it a bit (reduces runs and sags), and it makes the sanding much easier by creating a tack free surface. Epoxy is extremely tough, and waterproof. All my future molds will be fabricated with this technique.
Applying the paper mache. Finally!
Afterwards, when you've stared enough at your work of art, you can apply the paper mache. It's a very simple process:
Glue: I use Tight Bond glue. If you want a white finish, use Elmer's white glue.
Paper: Next, tear up some of your favorite paper into 1-3/4 inch wide (45mm) strips--BTW, thinner paper makes a superior horn -- I prefer to stay at or under 24lb stock. Also, I suggest you tear, not cut the paper. The fibers that result from tearing make a better bond along the edges. By the way, paper has "grain"-- generally, it's much easier to tear in one direction vs. the other. Tear in the direction that yields the straightest strips. If you're a perfectionist ;^) use a straight-edge to tear against. Don't use paper that falls apart when wet (cheap 20 lb copy paper, for example). It'll drive you crazy. Another product that works quite well for rapid fills is paper wallboard tape--it's perforated and allows glue to penetrate through the tiny holes.
When you have a nice, large stack of torn paper strips you can move to the next phase: Mold Release: Apply Vaseline, and don't be bashful with the application. Too little release and your horn will stick to your mold. Too much and you just have a bit of an oily appearance. This eventually soaks into the paper, or can be removed with paint thinner, or mineral spirits. If your horn sticks, you'll have to gently tear it off the mold, mourning louder than a funeral procession.
Time to apply the paper mache: I dip the paper into water, strip by strip, each time wiping the excess water away, then one by one lay and paste them to each other along the edge of the horn's mouth, overlapping as I go (you can lay the paper along the horn's axis, or along the perimeter of the mouth--both techniques work). Each strip of dampened paper is coated with glue. I use a paint brush to apply the glue to the damp paper after it's been placed onto the mold. Avoid brushing glue onto the mold's surface, as it's rather unsightly, blocks your view of the paper finish.
Take care to apply no more than three or four layers at a time. If you go all out and do a dozen, you'll end up with a much longer drying time. Something to note: I consider overlapping paper to be counted as two layers, so if you overlap 50% then you have an immediate two layer count. The mouth is the hardest part of the project to get sufficient paper application, so I usually add extra short layers to the mouth between layers of hot-mud.
Twelve layers (remember: 50% overlapping counts as two layers), it's so slow, tedious... Consider this a form of meditation. Believe it or not, your back will get quite a work-out. You'll probably develop greater hand/eye coordination and an attractive set of deltoids.
After layer twelve, set the project aside in a warm room for several days (maybe longer during the winter, or if it's humid). As with all the layers, I use a fan to circulate moisture away from the project. Don't aim the fan directly at your project, just circulate the air. If you don't have a fan, don't fret, just allow a little extra drying time.
When you have twelve dry layers it's time to remove the horn from the mold. Be gentle! On smaller molds, I work mine from the mouth's edge with a bit of a twist and nudge side to side until it pops loose. If your horn has a one inch throat and/or is long in axis length (30" or so), you may have to fabricate a little 3/4" wide collar (I rasp mine to size from a PVC plastic coupler fitting that's been shortened) and epoxy it to the throat of the horn with Loctite 5 minute epoxy. When the epoxy has cured -- try to wait at least three hours minimum -- connect a little gear puller to the collar and the threaded rod in the center of the mold and pull the horn from the mold. I generally apply tension to the collar with the puller and then gently slap the sides of the horn. I repeat this process as often as necessary to release the horn. You might be able to pull the horn completely with the gear puller, but I prefer to slap the rascal into submission ;^) Eventually, the horn will pop off. Also, depending on the quality of the gear puller, you may have to use one hand to keep the puller clamped to the collar as it tends to want to slip off. Note: consider using a heat gun to warm (not char) the paper mache and melt the Vaseline.
It's going to be very tempting to remove the horn before it's ready. DON'T. When it's ready, the paper will have shrunk a bit--it'll begin pulling away from the mold's lower lip, and there will be almost no flexing of the paper at the horn's mouth when you apply pressure (paper mache is strong). If you tug on the horn too soon, you'll dislodge the first layers of damp paper and end up having to redo the entire project. Patience, my friend, patience.
If a week or more has elapsed, and you feel the horn is completely dry, yet it won't pull off the mold, then you may have a problem with your mold release (the Vaseline). Assuming you applied plenty of release agent, then the best solution is to fabricate two plywood ribs and attach them to the horn. I glue them on with two part, Loctite epoxy. After the epoxy has set, I apply three layers of paper mache to the plywood and surrounding horn area. The idea is to beautify and strengthen the bond between the ribs and horn. There are times when I skip the added paper step and still manage to pull the horn from the mold using the plywood ribs by themselves, but if the ribs don't have a snug fit to the horn, they may tear away during the pulling process. a few layers of paper mache is cheap insurance that the ribs will stay put.
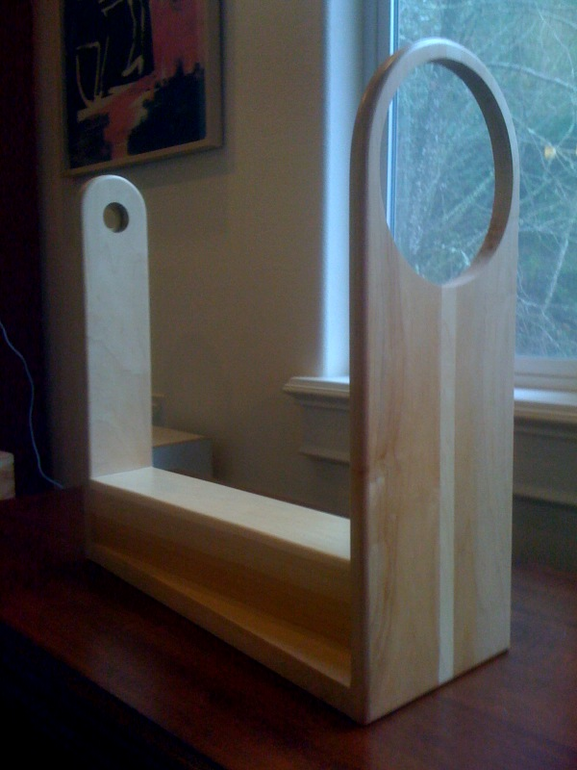
You'll require a horn mount:
When you succeed in removing your show worthy prize, you have to create a mount. Study the picture below. Notice the design technique I used (the mounting holes for the compression driver haven't been drilled yet). You're free to copy the idea--for nonprofit use, of course. Attach a quality compression driver and be prepared to weep tears of joy. Write me, tell me what you think.
Here's an iPhone video of my horns. Audio quality isn't nearly as good as live listening.